Showing posts with label free photoshop tutorial. Show all posts

Making Pentagon Boxes - Freebies included!


Ok, I decided to do another post on making paper boxes. I just LOVE making paper boxes! This week I've been busy creating a pattern for an pentagon box. Like my square boxes, I wanted to create the file in Photoshop, with different layers you can copy and paste over. Today, though, I am going to also provide a step by step video of how to create the box. This pattern is just a little bit more difficult to create--especially the lid. If you have two-sided tape, that would really help. But you don't have to have it--I don't! I'm also going to include in this tutorial some downloadable boxes already made and ready to go--just print them, fold them and tape them and they are yours! (the kits used in the samples are from Atomic Cupcake and Digital Arts Cafe)

Also--if you like this tutorial, I have similar tutorials you may also want to check out--Making Paper Boxes, Envelopes, Heart Boxes/Favors, Triangle Box, and Box with Separate Lid.

Here is the step by step video. You can download the pattern by clicking on the link below. There are step by step directions after the video if you prefer that method.


The Pattern

To get the pattern, go to my TPT site here: Pentagon Box Pattern
It makes a fairly decent sized box. But if you want one the size of those in the picture, you'll want to change the size a little bit. I made it this size so I could fit the whole pattern on one page. Any bigger, and you'll have to move the lid to another page. If you DO want to change the size, here are the directions.
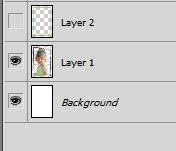
1. On your layers menu, highlight all four layers--the lid lines, lid cover, box cover and box lines. Hold down the CTRL key to highlight all four layers at the same time.
2. Press CTRL+T. Hold down the SHIFT key as you grab the corner and resize the box to the desired size.
3. Now press enter and unhighlight the layers.
4. Go to File, New and create a new 8 1/2 x 11 page. Go back to the original document.
5. Highlight the lid cover and lid lines layers, and drag over to the new page.

That's it! You MUST do it this way, because if you change the size of the box and the lid separately, the lid might not fit the box anymore! Make sure you resize them together so that they will still fit.

I am also adding a PDF version of this pattern, in case you are not savvy on Photoshop and just want to print it on regular scrapbooking paper--here is the download-- Pentagon Box PDF.

Kits by Connie Prince

For my kit, I am using Sweet as Can Be by Connie Prince. I love her stuff! Connie has kindly given me permission to give this finished pattern out as a freebie .pdf. If you like this kit, please go see her stuff! I LOVE her style! I will also give out two other freebies using two more of her kits - Sunny Rays and Warm Days, and Moment in the Sun.


Directions

Here are the written directions on how to digital scrapbook this paper box. There is a video at the bottom.
1. Download the file attatched above--the pentagon box. Unzip it, and open it in Photoshop.
2. You'll note that there are four layers--the Box Cover, Box Lines, Lid Lines, and Lid Cover. Make sure the line layers always stay on top.
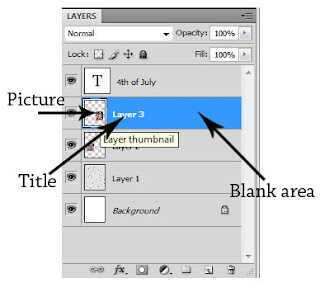
3. Pull in the paper you want as your main background. Place it so it completely covers the blue Box Cover layer. Put your cursor on the Box Cover layer, and then CTRL+click on the layer (the picture portion of that layer). You will now see "marching ants" around the layer.
4. With ants still marching, click on the paper layer. Then do CTRL+C and then CTRL+V. Now you've copied a new Paper layer, in the shape of the blue Cover layer. You might want to press the eye button on the Box Cover layer to make it invisible. You won't need it again.
5. Make sure the Box Lines layer is on top of the new Paper layer.
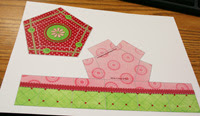
6. Decorate the box however you want, using other items from your kit. NOTE: This box is upside down. The bottom rim of it is actually the top. So if you want your decorations to show, you want them where the crease is.
7. Do the same steps for the lid.
8. Print. I would suggest that for your first attempt, you print only the pattern and attempt folding it to get the hang of it, before you print the real thing. This box takes a little pratice in folding--the lid especially. Anyway, the best case scenario is to print it on cardstock, on a laser color printer--though an ink jet would work, of course!
9. Cut it out carefully and as perfectly as you can. Make sure that you cut the full tab out on the two lower tabs.
10. THE BOX: Fold all edges as perfectly as you can.Hopefully you remembered to keep your lines layer on top, so they are very easy to see.
11. Now use tape, glue, or two-sided tape to put the box together. The two ends will overlap. I usually tuck the small one in back, the longer one in front. Then I just did a loop witht scotch tape to tape it on top. Two-sided tape is best, but I didn't have any. The disadvantage to not paper scrapping anymore!
12. LID: This part is a lot harder, and it took me some practice to really get it down. First, fold on the lines. You'll notice that the lines bend at the ends--so you have to fold the straight line, then the diagonal lines after that.
13. Now the hardest part. Use your thumb to create a crease inbetween the two diagonal lines, and fold it inward. Then press it to one side. Make sure that it forms a 90 degree angle when you do. Then use tape or glue to keep it there. I wish I had two-sided tape for this, but I just use scotch tape. I don't like it because you can see the tape, but oh well. I'll live.
Once you've done that for all five sides, your lid is finished! Yay! It might be a tight fit--you have to be pretty exact or it won't fit right. Just be sure that when you make the box, you don't let it be loose--make sure you fold it and tape it exactly. Also, make sure that when you fold the lid, each crease is a 90 degree angle.


And last of all, here are a few downloadable pdf files--all of them are completely finished pentagon boxes, ready to print, and all are made with kits by Connie Prince! It includes the file for the box used in the example. You can find the free designs included with the pattern. 


And here are some photos of the new and improved design, using the "Pink Fusion" kit from Lindsay Jane.


Lesson 16: Using Cut & Paste in Digital Scrapbooking

So I was making a new page the other day, and I noticed how often I use cut and paste. I just do it instinctively, but I'm not so sure that new digital scrapbookers would use it like I do. Cut and paste is, of course, a feature seen in a lot of programs. I've been using it since the old blue screen WordPerfect days. And although as a junior high computer teacher it is often the bane of my existence, in digital scrapbooking it can be a real time saver! Cut, paste, and copy are commands that it is well worth learning the shortcut keys for.
  • Cut - CTRL+X
  • Paste - CTRL + V
  • Copy - CTRL + C

Sidenote: You may have noticed that throughout these tutorials I use shortcut keys a lot. It saves SO much time, and I find it a lot easier than going through all the menus. Here's a chart in to remind you of the shortcut keys that you use a lot in Photoshop. You may want to save it somewhere for a quick reference, or even print it. Anyway, you've already seen in Lesson 14 how I use cut and paste for borders. Well, I pretty much use this process for everything. I'll review that a little in my list here of how I use cut, or copy, and paste.

1. Paper on Paper- Most of the time, when I'm creating the background for a page, I pull in the full background. But then I want a strip of another paper to go on top--I don't want to drag the full paper in, so I use my marquee tool to draw a dotted square around the area I want. Then I just do copy, then click on my new page I'm working on, and paste. It's not always exactly the size I want, so I will either use Transpose or just draw a marquee around the area I don't want and press delete.

2. Creating Borders - In Lesson 14, I have a video tutorial of this. It's a great way to create a border. Just CTRL click on the picture part of the layer you want to make a border of. Then create a new layer. Then go to Edit, Stroke, and create your border. Then, copy that border, and paste it onto the paper you wish to use. Highlight the paper layer, while the border you just pasted still has marching ants around it. Copy, and then go back to your original page and paste. You now have a border that is cut from the other paper.

3. For Journaling - On a lot of my pages, I choose a background that is too loud for me to write my journaling on. In that case, I just find a lighter paper, and use my marquee to cut it and paste a small square of it onto my page. Then I can change that square to the proper size, format it how I want (adding shadow, a stroke, maybe using an action) and copy it as many times as I need to for my journaling. Here's an example of a page where I've done this.


As you can see, I have several little white pieces of paper that I put writing on. I just created the first one, then copied and pasted it, changing the size when necessary. This is a great way to get journaling in, but still be able to use those fun, but loud, backgrounds. (Does it bother anyone else that I used the same picture TWICE on this page? Drives me nuts. I was pretty horrified when I got my book printed and saw that. There's one problem with printing books--there's no going back!)

4. For Resizing - Ok, say on your page you have a side bar of paper, and you want a ribbon to run down bottom half. You pull in the ribbon, and it's too long. You could use your marquee to highlight the area of the ribbon you don't want and press delete. OR, you could cut and paste. CTRL click on the side bar, then click on you ribbon layer and copy, then paste it. The ribbon you just pasted is now the exact same width as your side bar.

Alt + Drag

I believe I've shown this in previous videos, but I wanted to point it out again. If you want to copy a layer, you can find the layer on your layer pallete, right click and do copy. OR, you can do it the fast way. Just click on the layer in your actual page, hold down the ALT key, and drag. Instant copy. SO easy. When I found this little tool everything got A LOT easier. Ok, here's a video example of some of the suff I talked about in this lesson--some of it is hard to explain--this calls for a video!

CutPaste2(Click to view)

Lesson 15: Scanning & Resizing Pictures

Many of the people I talk to about digital scrapbooking are overwhelmed by the sheer number of photos from the past that they need to scan in in order to get caught up with their scrapbooking. Many of them may be unfamiliar with using a scanner, or may not know what to do with the photo once it's scanned in. This post is to take you through the process of scanning your pictures and making them ready to scrapbook.


But before I begin, I did want to say this: Don't let yourself be so overwhelmed by "catching up" that you never get started. You DO NOT need to go in chronilogical order when creating your books. If you are really behind, my advice you to is to begin with this year or last year--something recent. Get your feet wet. Get confident. Take out the extra step and stress of scanning photos until you are more comforatable with making pages. It will not be NEAR as overhwelming to go back once you've already started with today's photos. Old stuff won't be any fresher next year than it is right now, but you will forget THIS YEAR very quickly, so get started on now while it's still NOW!


Ok. Couple of things you need to understand first.

Resolution: Resolution is the number of pixels in a photo. The more pixels, the larger the photo. A pixel is a single dot of the picture. Now, if you take a very small picture and try to make it really large, it's going to look all pixeled and blurry. So it's very important you pay attention to the size of pictures that you use.

Digital pictures are easy--they will always be large. You don't have to worry about the resolution when you pull it into your page, so long as you have made sure that the page you've created is 300 dpi--we talk about that in lesson 2, when creating a new page.

Now, when you SCAN a picture, you won't get as good of resolution. Scanned pictures will never look as good as digital ones. But they are certainly still workable and useable.

Here's another thing about resolution--when you are using a picture for the internet, the demands for good quality aren't as high. A picture that is 400x400 pixels is plenty big for a blog or Facebook or a website. But, if you were to print a 400x400 picture, it wouldn't be very big at all--only about 1 1/2 inches!

Resizing Pictures for Email or Online


When you have a digital picture, it's VERY large. Trying to attach it to an email can be problematic because the file is too big to attach. Also, if you try to upload it to a blog or facebook, it will take a LONG time. And it's not really a good idea to put large photos online. They may look small on the page, but then someone can click on them and save the larger version to their own computer for nefarious purposes. My advice is to keep the photos you upload or email at a much smaller size. How do you do that?

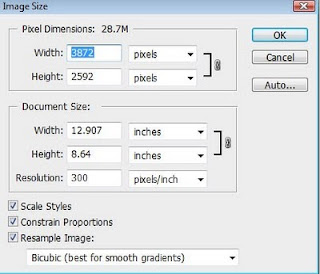
Pull in a digital photo to Photoshop. Go to Image, Image Size. This will tell you how big the picture is. It's probably something like 3872 pixels by 2592 pixels--or about 12x8". That's pretty darn big. If you are using it for a scrapbook page, that's fine. You can resize it on your page. But if you are going to email it or upload it online, you will want to make it smaller. You can change either the pixel size or the inches size--I usually just change the pixels on width to something between 400 and 900. There should be a checkmark already there on "constrain proportions" which will make sure that when you resize, the proprotions remain the same. Then just press ok. (this is in the video at the bottom of this post)

Scanning in Pictures

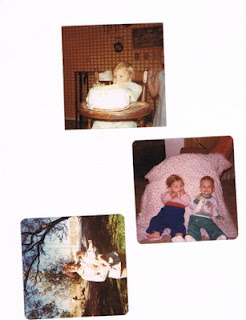
Ok, usually when you scan in pictures, you want to put several pictures on at the same time. It just saves time. That's fine--just make sure that all the pictures fit within the confines of the scanner and don't get cut off.

1. Once you have scanned the picture, you need to pull up the scanned picture into Photoshop. This might be tricky if you don't know where your scanned pictures go. Usually your scanner will have it's own file in your My Pictures file. Each scanner is different as to what the name of the file is. But you should be able to find it. Pull that picture into Photoshop.
2. Once you've pulled it up, make sure your HISTORY bar is open. (If it's not, go to Window to get it.)
3. Now, use your crop tool to crop your picture the way you want. Just choose ONE of the pictures--you can do the rest later.
4. What if your picture is screwed and not straight? No problem. Use your Marquee tool to draw a square that is roughly larger than your picture. Then press CTRL+T. Then just use the corner arrow to adjust your picture so it's straight. Then you crop it.
5. Now, save the picture. Make sure it's a .jpg.
6. Use your history bar to go back to the very beginning, when you first opened the file. Choose another picture and follow the same steps.
7. You'll notice that in these saved pictures you scanned, if you check the image size, they will NOT be as big as your digital pictures. Yup. That's what sucks about scanned pictures. But trust me, they will still look great on your page.
8. Also--if you need to rotate the picture, go to Image, Image Rotation.
Here's a video showing how to crop scanned pictures. It will also review some of the things I mentioned in lesson 3 about adjusting color.


Lesson 13: Silhoetting a Picture: Magic Wand, Lasso, and Eraser Tool

What would scrapbooking be if you didn't silhoette a picture? I have so many old pages where I've done this technique--sometimes VERY stupidly. I looked through some of my old scrapbooks to find an example, just for fun. There were SO MANY OF THEM. But most were of other people. Here's one of me from 1998--about forty lbs ago, though I think those scissors may have shaved off a few more pounds! Good news--you can still shave off pounds in Photoshop too, so that's good. Here's an example of a silhoette I did in my daughter Afton's book. I thought it turned out very nice!


So, how to create a good silhoette in Photoshop? First, I need to introduce you to a few tools in the toolbar--the Lasso tool (top), and the Magic Wand.

The Magic Wand Tool


When I remove a background, the first tool I use is the Magic Wand. What this tool does is select LIKE pixels. So, if you have the magic wand selected, click anywhere on your picture. It will highlight everything in that picture that is similar in color. Notice, though, on your options bar that there is a box marked "Tolerance." This is how you determine how...picky...the magic wand is. If you select 10, for instance, it will only select colors in your page that are VERY close. If you type in, say, 100, then it will do colors that are remotely similar. Then you simply press delete to get rid of what is highlighted


MAKE SURE that on your color picker, the background color is WHITE. Otherwise, when you delete you won't get that color.


The Lasso Tool


After you have used the magic wand tool to get rid of a lot of the background, you'll still need to fine-tune it with the lasso tool. This tool can, of course, be used for a lot of other things rather than silhoetting a picture. By simply clicking along the outline of the picture, you draw the shape you want. You MUST end up where you left off--clicking at the starting point when finished. Then your shape will have marching ants around it, and you are ready to delete it. OR, you can go to Select, and Inverse, and select everything EXCEPT what you outlined. THEN press delete.


Eraser Tool


The Eraser tool is also a very helpful tool. On your options menu, you can select the type of brush you want, and how big. (or you can just right click on your page once you have selected the eraser.) And then you can erase whatever you need. Pay attention to the Opacity on your menu as well--this allows you to fade out the edges of a picture manually. It can be very helpful in a collage. In fact, here's part of a page I did, using the opacity on my eraser:


I just used my eraser to fade out the left side of my picture and have it fade right in with the blue background.


Here's a video to show what I'm talking about--this one, I admit, is pretty hard to describe with words!


Magic_Wand_Lasso_Tool(click to view)


The Magic Eraser Tool


You know what? I love doing this blog. Because it makes me that much more motivated to learn more about this program. Sometimes I find a way of doing something and I always do it that way, and then I find something new and exciting! Like in another post, there was a comment about clipping masks and I'd never tried it--now I used it all the time. I'll do a post about that at a later time. Anyway, this just happened to me! While working on this post, (after I recorded the video) I was messing with the eraser tool, and found the most AMAZING tool, that would have saved me HOURS of time in the past. I wonder if this tool was available in Photoshop 7 or if it's just in CS4? It's the magic eraser tool. It's like a hybrid between the eraser and the magic wand.


First, you need to click on the eraser tool, and on the little arrow that it's the lower right hand corner of that tool. There are three options there--choose the last. Then, pull up the picture you want to silhoette. Click on the back ground, and POOF! It's gone! Now you may have to CTRL Z or use your History bar to go back if it didn't quite go where you wanted, but it's a lot faster than the way I showed you in the video!


Man, I LOVE Photoshop! I want to keep learning more, just like you--that's what realscrappy is all about. I'm not claiming to be the perfect expert--if you ever read something I do and think, "Oh, there's a better/faster way" then PLEASE write it in the comments section! Thanks!

Lesson 14: Picture Borders

So, as you look at my scrapbook pages on the left, you may note that I rarely have a picture without some sort of border. I'm kind of obsessed with borders. Most people seem to be happy with just putting a shadow around a picture and calling it good. But I hardly ever do that. I like to fancy it up, and I have lots of ways of doing that. So I thought I'd do a post today about several ways I do that.


Add a Stroke
First of all, there's the super simple but not as cool way--and that's the way I've already showed you in lesson 6. (demonstrated in full on the video) Adding a stroke is simple and fast, and a lot of times I do it this way for that very reason. My other methods may look cool, but it can time consuming, so I don't always bother. Here's an example of a picture with a stroke border.

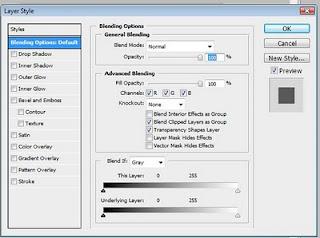
1. Double click on the blank area of the layer you want to change--in your layer menu.
2. In the Layer Style menu, check the "stroke" box.
3. Click on the WORD stroke, to get more options.4. Change the color of the stroke by clicking on the black box--remember, if you want to match a color in the picture, as I did here, just click on the color you want on your picture when the color picker is open.
5. Change the width of the stroke, and choose Inside, Outside, or Center. (This one is inside--that's why the corners are so sharp.)

6. Press ok. Remember, you can right click on the layer afterwards and choose "Copy Layer Style" then just click on the layer of any other photos you want the same border on, and right click and choose "Copy Layer Style."
7. I usually add a shadow as well as a stroke to most pictures. It also looks nice if you use a bevel.
Creating a Stroke on a Separate Layer

I learned this little trick in one of the .txt files that came with an action I bought from Atomic Cupcake. I think it was on the small silver action--another one, by the way, that it TOTALLY worth buying. Anyway, I've used this technique like crazy ever since. This can be used to create a stroke, like above, but when you make it on a separate layer, your shadow will go on the inside and the outside and it looks much better. We'll use this technique on the next two types of borders I show you. So learn it!


1. The first step is imperative--and I've shown it before on one of my previous videos. You need to hold down the CTRL key, and then click on the layer you want to border. Now, that's enough in Photoshop 7, but in the later versions, you need to make sure you click on the PICTURE section of the layer, not on the empty area, or it won't work. You know it worked if you can see the "dancing ants" marching around your picture in Photoshop. What you've done is not only select your layer, but selected the SHAPE of your layer.

2. Next you are going to go to Layer, New, Layer. Or you can click on this symbol on the lower right hand corner of your layer menu. Now, it's important you understand what you just did--you just created a new layer in the shape of those marching ants.

3. Now, go to edit, stroke. Choose the color of your stroke. Then if you want it inside, outside, or center. Choose a thickness--try about 30 px. Then press enter.

4. Now, your stroke looks exactly the same as if you had done it the easy way. But remember--it's a different layer than your picture. So double click on the stroke layer you just created and go to your Layer Styles menu. Choose a bevel and a shadow. NOW you should be able to see the difference. Sometimes I'll even go to Pattern Overlay (as discussed in Lesson 6). That's how i got the border to have a bit of a texture to it.
5. Keep in mind, though, that if you want to move the picture, the border won't come with it. So find the layers, highlight them both (hold down the CTRL key and click on one, then the other) and then link them. If you want them to be PERMANENTLY stuck together, press CTRL E. The only way to undo that is to go back in your history.

Using Paper on your Separate Layer

Ok, for this one, we're going to do the same thing we just did above, only we're going to add a step. What if you want the border to be made of the paper you are using in a kit? No problem. All you really need is copy and paste. Remember the shorcuts if you don't know them -- CTRL C is copy, CTRL V is paste.

1. So, do all the steps from above, only don't go into the Layer Styles. Just create a border on a separate layer. Color doesn't matter.
2. Now, open up from your kit the paper you would like to use.
3. CTRL click on the PICTURE part of your border layer, and press CTRL C. Or, Copy.
4. Now, go to your paper, and press CTRL V, or paste.
5. Repeat the step where you CTRL click on the PICTURE again, getting those dancing ants. Now on your layer pallette, click on the Background layer, which is the paper you chose. Press CTRL C.

6. Go back to your original picture and press CTRL V. You now have a border that is "cut" from that paper.
7. NOW go into your Layer Style menu (by double clicking on the new layer) and add a shadow or whatever else you want.
8. Keep in mind that your original stroke is still there--you may want to delete it, or at least HIDE it by clicking on the eye icon next to it. That makes it "invisible" but you can always make it visible again by clicking on the empty box where the eye is supposed to be.
9. This process takes only seconds--it may sound confusing, but watch the video and you'll pick it up quick. It's MUCH harder to explain than to do!

Using an Action on a Separate Border Layer

This last one I use a lot--adding an action to a border. Now, hopefully you've already read Lesson 10, which talks about actions. I will demonstrate in the video how to add an action, and I'll use the Sparkle action by Atomic Cupcake.


1. Create a separate stroke layer, just like we learned above.
2. CTRL Click on the stroke layer, so it has dancing ants all around it.
3. Choose your action, and run it.
4. Remember, depending on the action, it may require you to choose the color you want your layer to be in the color picker in your toolbar BEFORE you run it.
5. Pull the finished border back into your document, and place it on top of your picture. You may want to delete the original stroke you made.


**NOTE - I have had a little confusion on using this feature on SHAPES. If you are going to add a border like this to a shape, you have to RASTERIZE it first. So, draw your shape, right click on the shape in your layer panel, and choose "rasterize." Then you can CTRL+click and get the marching ants, and create your new layer.
Ok, now for a video!

Adding_Borders

Lesson 12: Uploading your Book

UPDATE: The Cherishbound site is no longer available. I now use Mypictales.com. However, some of the information in this post is still useful and applicable for other publishing websites.

Ok, yes, this is a shameless plug for my favorite website for digital scrapbooking. But this company has given me so much with my beautiful books, plus I wanted to demonstrate how to upload a page into a book, and this is the only way I've ever done it! Now, usually with Cherishbound, in order to create a book, you have to have a consultant. I've contacted the company, and they have provided me with a special URL--if you click on this link, it will allow you to create a new account and get started right away! I'm not sure how long this will last--so even if you aren't ready to create a book, get a login today.


So, here's a little more about Cherishbound, and then I will have a video for you!

To see pictures of my new 2010 yearbook, click here!

First of all, Cherishbound is NOT a digital scrapbooking site. At least, that is not their focus. They focus on learning to write your story. And they have some fabulous products like Story Starters, that will give you help in writing your story. There are different starters for different subjects, and they are full of questions and ways to format your story that can really help you. My sister (also a digitial scrapbooker--in fact, she got ME started) used them when she created a book to honor my grandmother and her life. The story starter really helped her know what questions to ask and how to organize the book. The way I see it, there are a lot of great stories hidden in your family that you can only bring about by asking the right questions. Story starters help you find those questions. It's pretty amazing. Cherishbound is what helped me switch my style of scrapbooking from a collections of photos, to a journal with photos. I do a lot more writing because of it. If you are creating a book for a special event, that's when story starters can really help. To see some of their story starters, go to http://www.cherishbound.com/products/sscatalog.php?c=53_21.


You'll find that scrapbooking can go a lot faster if you do the writing first. Then it's just copy and paste. Here's an example: My sister has three children. She wants to make a baby book for her third child, just like she did the first two. But--when does a mother of three ever have time to sit down and scrapbook? But then--if she waits, she'll forget all those special moments, the mile markers, when he walked, his first word. So, she writes it first. She just adds to it little by little in a Word document. And then, when she DOES have a few minutes to work on her book, part of it is already done. Just copy and paste what's needed.


Here's another example: A few years ago, a friend of mine wanted to make a book for her adopted daughter. She just wanted it like a little storybook she could read to her, that would tell her the story of her adoption--so she'd grow up knowing all about it. Not being a digital scrapbooker herself, I told her I'd help. So she came over one day, and we got that book done in one afternoon. She'd already done all the writing, typed it up, and emailed it to me. Then I just picked one kit, and quickly put out a good 20 pages, cutting and pasting her text, and adding a few pictures and elements. It was a short book, and a mini one--not a full size 8 1/2 x 11. And it's very much loved. And it was done in ONE DAY. Yes, writing first can be useful!


In Cherishbound, you can also make a book without using Photoshop at all. There are templates that you can use where you choose the location of your text and photos, and then just choose a border for the whole book. And it looks very nice--though I ten times prefer to do it in Photoshop! They also have a new thing called StoryClub. Honestly, I don't know a lot about it, but it's a great way to get discounts and deals when publishing. You may want to look into that when you are on the site. Its still a very new program.


Ok, now for a video that explains
  • How to save your files to be ready to upload
  • How to create a new book in Cherishbound
  • How to upload pages in Cherishbound
  • How to use templates
  • How to insert your pages
  • A quick look at my current book

Using_Cherishbound(click to view)

Lesson 10: Using Actions

UPDATE: The Atomic Cupcake website, where I get most of my actions, has closed. However, I did find that you can get about 70% of them for free at the following link: FREE ATOMIC CUPCAKE ACTIONS. This is not a link that I have created, but just stumbled across. You MAY have to create a login to get them, but it's worth it. I have downloaded it just fine, and the file includes 109 actions! Unbelievable!

Actions are one of my favorite features in digital scrapbooking. I am very excited to tell you all about them. My favorite site is Atomic Cupcake, which is now closed. But, as I mentioned in the update above, you can download many of their actions for free. There are also many other sites that do actions--there are A LOT of photography actions. I like Atomic Cupcake because her actions are specifically for digital scrapbooking. You can actually create your own elements using them.

What is an action?

Actions are like a macro, if you ever use Microsoft Word. It's basically a set of instructions that are recorded and saved. So you just pull up the action, press play, and wait. You will see Photoshop going through a whole bunch of steps on its own--sometimes it can take quite a while--and then suddenly, your work has all these awesome changes to it.

How do I install an action?

For me, I created a specific folder where I put all the actions that I download. I have a Digital Scrapbooking file, with subfolders like "kits", "templates", "patterns", and "brushes." I also have an actions folder. Once you direct Photoshop to this folder for an action, it will always go there automatically unless you redirect it somewhere else.

So, in order to download it, you may need to unzip the file so that it is an .atn file. Then just place it in a specific place where you need to find it. That's it. We'll go over how to get it from there in a minute.

Where do I get them?

First and foremost, the mother of them all--atomic cupcake. Bless this site. It's changed my world. I have purchased almost every action from this site. As mentioned above, it is now closed. I totally cried. Please go to the link at the top of this post to download 109 actions of hers for free! You will need them in order to do this tutorial.

Another site I go to is Panos FX. (this link will take you right to their free actions) They have some freebies and some for purchase. I have used several and they are really great. They can make some really fun page layouts, though their focus is more on photography than digital scrapbooking itself.

A third place I've gotten actions is thePioneerWoman.com. She's got two great actions for making your photos look FABULOUS.

You can also just do a Google search for actions. My sister is heavily into photography and has purchased some actions from well known photographers. These actions can cost over $40, but I was amazed to see what they could do with a single photo.

How Do I Run an Action?

Below are videos that will show you this entire process, but here are the directions in writing.
In Photoshop, make sure you have the layer you would like to add an action to selected. If it is a shape, you will probably want to rasterize it first. (Just right click on the layer and chose Rasterize). You do not have to rasterize your text, but if you text has a gradient on it or something, its a good idea to rasterize it first.

1. Pull up photoshop and create a new page. Draw a shape and rasterize it.
2. Go to Window and click on Actions to open up your actions toolbar. Mine is usually tabbed with my history bar.
3. On the right of the actions bar, click on the pull down menu button.
4. Select Load Actions, and find where you have saved the action you have.
5. Place your cursor on the second line of the action, where there's a play button. (you may have to pull it down)
6. Press play on the bottom of the action menu and wait!
7. It's also a good idea (and sometimes necessary) to highlight your layer. Do this by holding down the CTRL button, then click on the picture part of the layer. You'll now see dancing ants all around the layer on your page.
8. Depending on the action you are using, you may also need to select the desired color you want in your color picker before starting the action.

Ok--written, it's hard to follow, I know. So I'm doing a video for each of the four types of actions you get from Atomic Cupcake. These are also ones I've personally used a lot, and are all available in the free download.

1. Gold - a total must have! This action doesn't require you to choose a color--whatever you have selected will be turned to gold!
Gold_Action_-_Atomic_Cupcake (click to view)
2. Gemstone- This is an awesome one! Make sure you select the color you want it to be in the color picker before you begin.
Gemstone_Action_-_Atomic_Cupcake (click to view)

3. Torn Paper - The first one I ever bought from this site! I suggest it's your first, too! This is one designed for papers rather than for shapes or text--though it CAN be used that way. There are several others for paper like inked or chalked edges that are really great.
Torn_Action_-_Atomic_Cupcake (click to view)

4. Cast Pewter - There are several actions like this one, that require a black and white image.
Cast_Pewter_Action_-_Atomic_Cupcake (click to view)
Well, that's all for actions. Don't forget to also check the Panos actions and Pioneer Woman actions if you find these are interesting. I use them all!

Can I Make My Own Actions?

Yes you can! I am certainly not capable of making ones like Atomic Cupcake, but the other day I made one because I had a bunch of files that I needed to copy a layer, fill it black, take an outline of the black layer, and then delete the original. So, I opened my Actions panel, clicked "record," named my action, and then just did the steps, pressing the stop button when I was done. Then I could just repeat that action for all the other files. It can be done quite easily!

Lesson 9: Creating Shapes

In today's lesson we'll first learn how to use shapes. In Lesson 10, we'll use some actions on those shapes and also on some text. Let me just say here and now that the use of actions is what defines my style. I use actions on nearly every page. Most scrappers I talk to either don't use them or don't really know what they are. But, you pretty much have to know how to do shapes before you can do an action--so let's get started!

Shapes

Creating shapes is a very basic part of using Photoshop, and incredibly versatile. I use shapes to create my own elements and papers, and a million other things. They are quite easy to do. You will be using the shape tool today, which looks like this:


The shape tool is a box, and when you click on the lower right black arrow on that box, you get this menu.

1. Open Photoshop
2. Open a blank scrapbook page in the size you prefer
3. Click on the shape tool, and choose a shape you want--don't do line or custom just yet.
4. Now, before you draw your shape, choose your color with the color picker--that's the white and black boxes pictured above. The white box is your FOREGROUND, and the black is your background. To change your foreground, just click on that white box. This will give you that same color picker menu you got when you changed your text color. Choose a color and press ok.
5. Draw you shape on your page.


There you go! Now, let's mess with your shape for a moment.


Changing Color

Simply changing the color in your color picker will NOT change the color of your shape, once you've already drawn it. If you want to change the color, go to your layer and double click on the colored box. This will bring up the color picker menu again, and it will change your shape color.

Changing Shape

Just use your CTRL+T command to change the shape of your box, once you have drawn it. You can treat it just like a photo that way.

Custom Shapes

Now, you'll also notice when you pull down the shape menu, that you have the option that looks like this:

You just need to click on the custom shape, then pull down the shape menu and there are several shapes there to choose from. You can also click on the black arrow on the right and find a list of several other shape sets, like Animals, Ornaments, and Symbols. Just click on them and append it to your list, so you can see them all. At one point, I did a search online for "free Photoshop shapes" and got a whole bunch of new ones, complete with directions of how to install. You may want to try that if you find you are using shapes a lot. Once you choose a shape, just click on it and draw it on your page like any other shape. These will be used in lesson 10 when I teach actions.

Layer Styles

All the same layer styles we tried on our photos and text will also work on our layers. Double click on the empty area of your layer to get the menu. Try a shadow, bevel, stroke, etc. Then, let's try two other styles that we haven't covered before--they also work great on text, though I wouldn't use them on photos.

Gradient Overlay

Click on Gradient overlay. Your shape will automatically go to a black and white gradient. The color you originally picked will not show up. Click on the black and white gradient bar on the right to bring up your gradient editor. Now you can create any gradient you want! You can choose from the default options give, or you can create you own gradient by creating new stops on the larger bar. Here's a video of how it's done.
Adding_a_Gradient (click to view)

Pattern Overlay

I love pattern overlays! First, uncheck the gradient overlay box so your shape is back to how you originally had it. Click on the down arrow of the pattern shown, and you will have several more patterns to choose from. Mess with the opacity and scale to get a look you really like.

There are more patterns available as well. When you pull down the menu to get more patterns, you see a small baclk arrow to the left. Click on that, and toward the bottom you'll see "Artist Surfaces" click on that and append it to your list. Do the same with all the other patterns on the list.

Here's a video showing how to use this feature.
Adding_a_Pattern_Overly (click to view)


Opacity


Changing the opacity of a shape is how you can create a vellum look on your shape. It's really quite simple. When you have your shape layer selected, go to your layers menu. Simply click on the opacity arrow and change the level of opacity. That's it. You now have created vellum. In my second book--my wedding book--I did all the captions on vellum. I just drew the shape and size I wanted, changed the opacity, and put my text on top of it. I then drew a little tiny circle, put a bevel on it, and used that as the "pin" that was sticking it in. Like this:

As a little side note--notice how there is vellum on TOP of my wedding picture. Then I just used the marquee tool and drew a little square. Making SURE that my VELLUM layer was selected and NOT my picture, I just pressed delete. That's how I made it look like my picture was behind the vellum.

Rasterizing Shapes

Most of the time, when I work with shapes, I rasterize them as soon as I can. The way you do this is to select the proper layer, then to to Layer, Rasterize, Shape. Shapes that are rasterized are much easier to work with, and they don't have that annoying edge around it. You cannot use an action on a shape unless you have rasterized it. But, after you rasterize a shape, you can't change the color of it the same way. Instead, you have to choose your Paint Bucket tool and fill it in with the color you want. So, don't rasterize until you are sure you have made the shape the way you want.

Lesson 7: Puting it Together - Making a Page

UPDATE:

The video on this page was not working very well, so I created a new one today! Please enjoy this 8-minute video that will show you a how to create a simple page, step by step. If you haven't read my previous lessons on "the five things" you may want to read them and learn them before attempting to follow this tutorial.

This page to the right is the page we will be creating in the video.

Now, in order to do this, you are going to need a kit. The kit I used here, though it was once free, is no longer available. I got it at peppermintcreative.com. That site has a free kit available at:

http://www.peppermintcreative.com/index.php?main_page=downloads

Their previous free kits are available on their site for only $3.00 if you click on Coordinated Kits on the left. They are definately worth getting!

Before we begin, there is also one more tool I will be introducing in this lesson, and that is the marquee tool.
This tool will allow you to select an area of a photo or picture. Then you can use your arrow tool to cut and paste it as a new layer, or drag it into another photo. You will see a demonstration of it in the video.

If you are going to follow this tutorial, have Photoshop open, as well as your picture file and your kit. (Remember, after you download a kit, you will have to unzip it. You will need to download winzip in order to do this. You can find it here.)

Lesson 6: How to Change Layer Styles

Guess what? YOU ARE ALMOST DONE. Yes, there will be many more lessons on this site, but like I said in my introduction--the essensials are lessons 2-6. These are the five things you need to know to do a basic page. And now, the last one! Actually, you can do a page already, but the stuff in this lesson is something I use on every page--it just makes it look SO much better.


Now, if you have open or have saved any of the pages you've worked on before now, use that. Otherwise, do the following.


1. Open Photoshop

2. Create a new page

3. If you have a kit you are working with, pull in a background page.

4. Pull in two pictures. Crop them, pull them into your page, and change the size.

5. Use your text tool to type a title. Make it a different color than black, and make it at least 72. (remember that when choosing a size, you can type in the size you want instead of choosing from the list. I am doing size 150.)


Here's a quick video on what I just did:

Lesson6_Starter(click to view)


Layer Styles


And now for one of the best menus in Photoshop. It's a scrapper's best friend. And that would be the layer styles menu. It's awesome. I use it on pretty much EVERY element I pull in from pictures to text to elements.


The quick way to get there is to double click on your layer. However, your layer has different parts. Whether these parts have official names, I have no idea. But you get the point. Where you doublt click in each area will get you a different menu. If you double click on the picture area you will get the layer styles menu. UNLESS it's text, and then you'll get the change text as we discussed in Lesson 5. If you you click on the title, this allows you to rename the layer--very useful if you are doing a page with LOTS of layers you need to keep track of. The blank area will also take you to the layer style menu.


So, double click on the blank area of one of your photos, to get this menu. The long way, by the way, to get to his menu is Layer, Layer Style, Blending Options.

Ok, now you may want to move the layer menu out of the way by grabbing the blue bar along the top, so you can see the layer you have highlighted and how it affects it.


Drop Shadow

Click on the drop shadow box. Then, click on the WORDS drop shadow. This will bring up new options on the right side of the menu. Here, you can change the distance, spread, and size of the shadow. This is, without a doubt, the layer option I use the most. I put a shadow on pretty much everything. Makes it look a little more 3-D.

Stroke

Now, click on the stroke box. Then the WORDS stroke. Here you can change the color of the stroke, the size, and the position. I usually change the position to center or inside, since outside leaves rounded edges I don't like. This is a great way to line your pictures with a nice border. Remember, when selecting your color, click on the red box, and you can use your color picker to select a color that matches your paper by clicking on the paper.

Click ok. Now highlight your words. Go back into the layers style menu by double clicking on the blank area of the layer.

Bevel and Emboss

Add a bevel to your words. Click on the WORDS bevel and emboss for more options. Expore them! See what you get! Try adding a shadow and stroke!

Now I want you go GO PLAY. Try out all the different options. There are many that I haven't used. Just try stuff out, and see what you get!

Here is a video of me doing these options.

Lesson6_layers2 (Click to view)

And now? You are ready to create your first page with realscrappy.blogspot.com!


Lesson 5: Working with Text

This should be a simple and short lesson! Text IS simple, but it's also important. Let me get on my high horse for a moment...

...ok. When I look online at different digital scrapbooking galleries, I'm surprised how few of them really bother with text. They always have some fancy lettering that says something vague like "Dream" but no explanation of the picture, no journaling at all. People! Remember that a scrapbook is NOT the same thing as a picture book! Write your story! If you have trouble writing your story, I highly suggest Cherishbound.com--a great site that supplies a lot of help for learning to write your story. This is also the same website I use to publish my book. Years later, your family won't care as much about how cute your froo-froo elements are, as they will about what the pictures ARE. Explain them--tell what happened. Don't rely on your memory as you show it to people. In my books I have several pages that are just straight writing. For my daughter's baby book, my husband and I wrote a full page each as a letter to her--this is far more valuable than the cutest kit or the best picture!

Ok. I'm done. Let's move on to text.

You should easily recognize the tool for text. Looks like this.


To begin, please open a blank page in Photoshop, the size you prefer. Remember to make SURE that you have 300 dpi and not 72, as may be the default. I really messed up a couple of pages in my first digi book by not knowing that little precious detail!

1. Click on your text tool.
2. Draw a box the size you want.
3. Now you will see a dotted square, and a blinking cursor.
4. Before you type, go to your options bar and change your options. 5. Change your font, size, and color. To change the color, just click on the black square (or it may be some other color). This is your color picker--there another such square on your toolbar, but changing that will not change your text. If you want to change your text color, make sure you select the color box on the OPTIONS toolbar at the top! When you click on the black box, it will take you to a menu where you can pretty much choose any color every thought of.
6. Once you've changed your options, just type! That's it!
I told you text would be easy.
Now, there are a few things you need to understand about working with text.
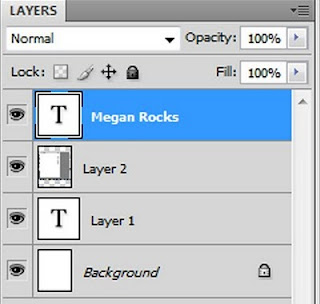
  • Text will be its own layer as soon as you draw your box.
  • In order to move text, you need to select it's layer and then move it. (Make sure you have the arrow select tool chosen when you move any layer)
  • What if you want to change your text? On your layer, click on the large T. Clicking on the other areas of the layer will pull up other menus which we will discuss in the next lesson. When you click on this, your text will be highlighted and you can go back and change it.
  • If you do CTRL+T, this will transpose your text just like your photos. You can change the size of the box, you cannot change the text itself.

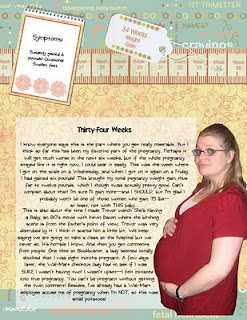
Getting your text to go where you want can be a challenge. By double clicking on the large T in the layer, you can change the edges of your textbox, making them more narrow or whatever, in order to fit where you want. Sometimes, if I am making text go around a large object, I will do several text boxes so they fit. Here's an example of what I mean. I wanted to make the text wrap around my pregnant belly. Unfortunately this isn't Word, where we just select the right wrap option. I created several text boxes in order to make this effect.


One of the main reasons I hated old school scrapbooking was that I hated figuring out how to make my headings look good. Before I switched to digital, I was still using my computer to create headings and then print them out for my book. I liked having lots of fonts to choose from, any color I wanted. I have a whole lesson on creating fun titles with text in Photoshop you might want to look at: Lesson 21: Digital Titles - Ideas & Suggestions. I also have a tutorial on how to warp your text or type it on a hand drawn path: Lessson 22: Curving Text using the Pen Tool.

Of course, Digital Scrapbooking gives you an INFINATE number of ways to make your headings look great! Lesson 6 will go into layer styles--these are great for your pictures AND your text, so we'll go into that part of text then.
realscrappy.blogspot.com

Lesson 4: Manipulating Photos

Ok--today's lesson is about how to manipulate photos in Photoshop. This is, of course, a HUGE area, but I'm not going to cover every detail--my goal here is to teach you five things that will help you create a page. I will only show you the most fundamental and basic things about manipulating photos--the first of which, is cropping.

Cropping
The crop tool looks like this. You may recognize it, as it's the same in Word and other programs.

Now, you are going to want to use the crop tool BEFORE you pull the photo into your page. This is, obviously, because if you try to crop it AFTER, you will end up cropping your whole scrapbook page.


1. Open Photoshop

2. Create a blank page in the size you want for a scrapbook page for later.

3. Pull a picture into Photoshop, but NOT into your scrapbook page.

4. Click on the crop tool

5. Draw the size you want. You can resize it after you click and drag to make it exactly what you want.

6. Press Enter.

7. Pull it into your scrapbook page. (It may be big, but don't worry--we're fixing that next.)

That's it. However, Photoshop DOES have one useful little tool. When you click on the crop tool, notice that the options tool bar changes. If there is a certain size you want, you can enter it into the width and height boxes. I do this if I want every picture on my page to be the same proporitons. Or if I am doing a full bleed picture and I want it exactly 8 1/2 x 11.


Transform

This is probably one of the most imporant tools you will use. Tranform allows you to change the size of your pictures. The shortcut is CTRL+T, or you can go to Image, Transform, Scale. But--why would you? That takes WAY longer, and you use this tool A LOT. So just stick to CTRL+T

1. Go to your scrapbook page where you have pulled in the photo you just cropped.
2. Make sure you have the layer of the photo selected.
3. Press CTRL+T. You will now see that the photo has clear boxes on the corners and sides. These allow you to resize the photo.
4. Place your cursor on the corner and drag. This will change the size.
5. Press enter when finished. (Don't forget this step! Or you will be stuck in transform and won't be able to do anything else!)

Now, here are a couple tips for transforming:
  • If you want the picture to keep its proportion when you resize it, hold down the SHIFT key as you click and drag.

  • Always resize from the corner if you want to keep the proportion of your picture

  • If you want to SKEW your picture, try holding down the CTRL key while dragging. I've rarely needed to do this, but it's good to know.
  • You can also grab the corner and and tilt your pictures.
Curves


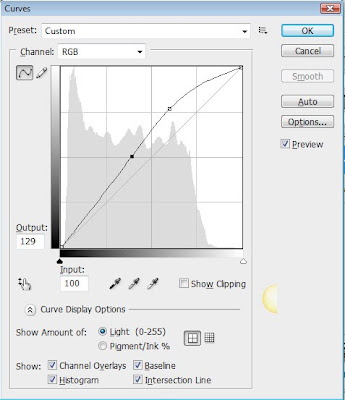
Now, there are SO many ways to mess with the color and lighting on a photo--I'm only going the show you the ones that I use the most. And to me, Curves is the best way to do this. The shortcut for curves is CTRL+M. Or, you can do the long way and go to Image, Adjustment, Curves.

Curves allows you to change the lighting of your picture. I usually lighten up nearly every photo I've got. When you pull it up, you will see a staight line. I usually pull up the top and down the bottom, so the line looks something like this.

But, this is something you'll just have to experiment with. You'll get it. If you have CS4, you can also click on the picture of the finger, on the middle left, and then use your mouse cursor on your actual picture to lighten and darken your picture.

Usually, curves is the only adjustment I use with my pictures. There are a few others under Image, Adjustment that you will want to mess with. There are also some important features on the image menu you may also want to mess with--particularly image size and image rotation.
Saturation & Color Change
Saturation is how much color is in your photo. It is possible to remove ALL the saturation, which would make your photo black and white. Or you can just take out some of it, so that your photos look a little more aged.
The quick keys for making your photo black and white is CTRL+SHIFT+U. Make sure you have the right layer selected!
You can also go to Image, Adjustments, Saturation. This allows you to gauge how much desaturation you want. Just move the adjusment lever and watch the change.
Notice there is also a color lever at the top. This allows you to change the colors in your photo. Now, I don't use this much on actual photos, but say you have a ribbon that you'd like to change the color of? Using the Saturation and Color options, you usually can get a pretty close shade. Also try checking the "colorize" box, this will give you a wider range.
Other Notes
There are a couple other simple things I want to tack on to this lesson that will make your life much easier.
  • CTRL + and CTRL - will allow you to zoom in and out of your page. I use that ALL the time.

  • The History bar is very important! CTRL+Z will only take you back ONE step. If you want to go back farther than that, look at your history bar. You should already have it up by default, but if you don't go to Window, History. This will show you a list of all the actions you've taken. You can just scroll it back as far as you want. There IS a limit, though--it will only go back so many steps, but it goes back pretty far.
Now, watch the video to see me doing all these steps!


Manipulating_Photos
(click to view)