I LOVE making envelopes! I have created my OWN PATTERN FROM SCRATCH! Though, I will admit--I did NOT invent the actual envelope. So maybe I'm infringing on copyright there...
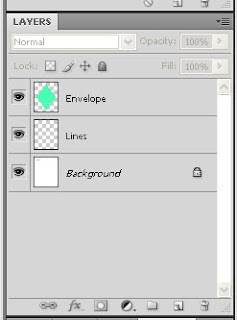
I have two free patterns for you that you can download from 4shared. They are just two different sizes of envelopes, in a Photoshop document so that the layers are retained. There is one layer, which is the lines of the box, and a second layer which is the background or "shape" of the box. It looks like this:
Here is the download--it's a zipfile for both sizes of envelopes, as well as some free samples you can cut and print.
RealScrappy Envelope Patterns
 1. Unzip and open the file. The ones in the examples here are Envelope 2--envelope 1 is a little slimmer and longer.
2. Note the two layers on the side: The green Envelope layer is what you will use to design and change your envelope. The Lines layer is to keep the lines visible so when you print, you can see where to fold.
3. Pull in the paper you would like to use as your background paper.
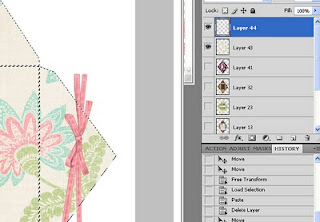
Then, on the layers tab, CTRL+Click on the GREEN ENVELOPE layer. You will see the marching ants as pictured. THEN, click on the paper layer that you brought in.
Do CTRL+C and then CTRL+V. You have now created a new layer--it is your paper in the shape of the green background layer.
 4. Decorate your envelope as you choose. Pull in elements and place them where you want, keeping in mind how it will look when folded. I use the copy and paste a lot on this one. For instance, I might pull in that pink ribbon, as shone below, and place it exactly where I want it. In order to get rid of the "excess" that is beyond the edges of my envelope pattern, I would do the same step I did in step 3. CTRL+Click on your background paper. Then click on the RIBBON layer. Copy and paste. Delete the original ribbon you pulled in, and now the new one is exactly the right size.
5. When you are finished, print your paper. One think I love about envelopes is that, unlike paper boxes, you don't really need to print it on thicker nicer paper. Regular paper does just fine. I actually prefer it on regular paper.
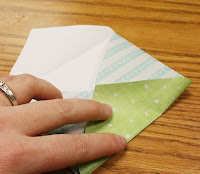
6. Then just fold it on the lines. Fold it as exactly as you can--it won't sit right if you don't.
 7. Use regular glue stick to glue just along the edges of the bottom side. Then press it on top of the two sides you have already pulled in.
All done! So simple and SO CUTE!


This information is about Making & Designing Envelopes bu using Photoshop.Check Advantage coupon
ReplyDeleteI will prefer this blog because it has much more informative stuff.EDDM PRINTING
ReplyDeleteI found this blog after a long time which is really helpful to let understand different approaches. I am going to adopt these new point to my career and thankful for this help.
ReplyDeleteCustom Packaging Boxes Wholesale
Custom Boxes
Slider Boxes
Mailer Boxes
Custom Soap Boxes Wholesale
Fancy Hard Boxes Wholesale
Nice Article!
ReplyDeletePrinted envelopes are a great way to add a personal touch to your correspondence. Whether you're sending invitations, thank-you cards, or just a note to a friend, printed envelopes add a level of sophistication and style.