...ok. When I look online at different digital scrapbooking galleries, I'm surprised how few of them really bother with text. They always have some fancy lettering that says something vague like "Dream" but no explanation of the picture, no journaling at all. People! Remember that a scrapbook is NOT the same thing as a picture book! Write your story! If you have trouble writing your story, I highly suggest Cherishbound.com--a great site that supplies a lot of help for learning to write your story. This is also the same website I use to publish my book. Years later, your family won't care as much about how cute your froo-froo elements are, as they will about what the pictures ARE. Explain them--tell what happened. Don't rely on your memory as you show it to people. In my books I have several pages that are just straight writing. For my daughter's baby book, my husband and I wrote a full page each as a letter to her--this is far more valuable than the cutest kit or the best picture!
Ok. I'm done. Let's move on to text.
You should easily recognize the tool for text. Looks like this.
 To begin, please open a blank page in Photoshop, the size you prefer. Remember to make SURE that you have 300 dpi and not 72, as may be the default. I really messed up a couple of pages in my first digi book by not knowing that little precious detail!
1. Click on your text tool.
2. Draw a box the size you want.
3. Now you will see a dotted square, and a blinking cursor.
4. Before you type, go to your options bar and change your options.
 5. Change your font, size, and color. To change the color, just click on the black square (or it may be some other color). This is your color picker--there another such square on your toolbar, but changing that will not change your text. If you want to change your text color, make sure you select the color box on the OPTIONS toolbar at the top! When you click on the black box, it will take you to a menu where you can pretty much choose any color every thought of.
6. Once you've changed your options, just type! That's it!
I told you text would be easy.
Now, there are a few things you need to understand about working with text.
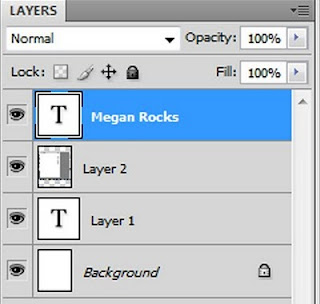
- Text will be its own layer as soon as you draw your box.
- In order to move text, you need to select it's layer and then move it. (Make sure you have the arrow select tool chosen when you move any layer)
- What if you want to change your text? On your layer, click on the large T. Clicking on the other areas of the layer will pull up other menus which we will discuss in the next lesson. When you click on this, your text will be highlighted and you can go back and change it.
- If you do CTRL+T, this will transpose your text just like your photos. You can change the size of the box, you cannot change the text itself.

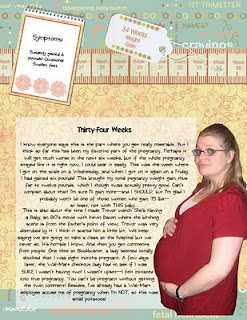
Getting your text to go where you want can be a challenge. By double clicking on the large T in the layer, you can change the edges of your textbox, making them more narrow or whatever, in order to fit where you want. Sometimes, if I am making text go around a large object, I will do several text boxes so they fit. Here's an example of what I mean. I wanted to make the text wrap around my pregnant belly. Unfortunately this isn't Word, where we just select the right wrap option. I created several text boxes in order to make this effect.

One of the main reasons I hated old school scrapbooking was that I hated figuring out how to make my headings look good. Before I switched to digital, I was still using my computer to create headings and then print them out for my book. I liked having lots of fonts to choose from, any color I wanted. I have a whole lesson on creating fun titles with text in Photoshop you might want to look at: Lesson 21: Digital Titles - Ideas & Suggestions. I also have a tutorial on how to warp your text or type it on a hand drawn path: Lessson 22: Curving Text using the Pen Tool.
Of course, Digital Scrapbooking gives you an INFINATE number of ways to make your headings look great! Lesson 6 will go into layer styles--these are great for your pictures AND your text, so we'll go into that part of text then.
realscrappy.blogspot.com

No comments:
Post a Comment