Now, if you have open or have saved any of the pages you've worked on before now, use that. Otherwise, do the following.
1. Open Photoshop
2. Create a new page
3. If you have a kit you are working with, pull in a background page.
4. Pull in two pictures. Crop them, pull them into your page, and change the size.
5. Use your text tool to type a title. Make it a different color than black, and make it at least 72. (remember that when choosing a size, you can type in the size you want instead of choosing from the list. I am doing size 150.)
Here's a quick video on what I just did:
Lesson6_Starter(click to view)
Layer Styles
And now for one of the best menus in Photoshop. It's a scrapper's best friend. And that would be the layer styles menu. It's awesome. I use it on pretty much EVERY element I pull in from pictures to text to elements.

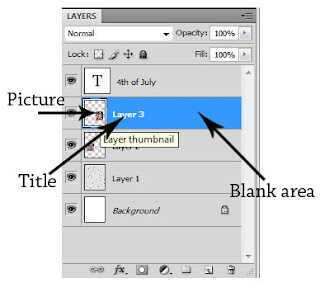
The quick way to get there is to double click on your layer. However, your layer has different parts. Whether these parts have official names, I have no idea. But you get the point. Where you doublt click in each area will get you a different menu. If you double click on the picture area you will get the layer styles menu. UNLESS it's text, and then you'll get the change text as we discussed in Lesson 5. If you you click on the title, this allows you to rename the layer--very useful if you are doing a page with LOTS of layers you need to keep track of. The blank area will also take you to the layer style menu.

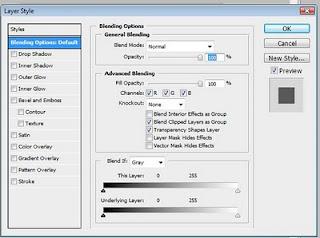
So, double click on the blank area of one of your photos, to get this menu. The long way, by the way, to get to his menu is Layer, Layer Style, Blending Options.
Ok, now you may want to move the layer menu out of the way by grabbing the blue bar along the top, so you can see the layer you have highlighted and how it affects it.
Drop Shadow
Click on the drop shadow box. Then, click on the WORDS drop shadow. This will bring up new options on the right side of the menu. Here, you can change the distance, spread, and size of the shadow. This is, without a doubt, the layer option I use the most. I put a shadow on pretty much everything. Makes it look a little more 3-D.
Stroke
Now, click on the stroke box. Then the WORDS stroke. Here you can change the color of the stroke, the size, and the position. I usually change the position to center or inside, since outside leaves rounded edges I don't like. This is a great way to line your pictures with a nice border. Remember, when selecting your color, click on the red box, and you can use your color picker to select a color that matches your paper by clicking on the paper.
Click ok. Now highlight your words. Go back into the layers style menu by double clicking on the blank area of the layer.
Bevel and Emboss
Add a bevel to your words. Click on the WORDS bevel and emboss for more options. Expore them! See what you get! Try adding a shadow and stroke!
Now I want you go GO PLAY. Try out all the different options. There are many that I haven't used. Just try stuff out, and see what you get!
Here is a video of me doing these options.
Lesson6_layers2 (Click to view)
And now? You are ready to create your first page with realscrappy.blogspot.com!

I think you nailed it! Great job coming up with the 5 basics... I believe in these steps too, and I believe beginners need to start with the basics before doing all the 'fancy stuff'.
ReplyDeletethank you so much for these beginner lessons! I cannot wait to get home and play tonight!
ReplyDeleteIm in love with this!
ReplyDeleteHi Megan. thank you thank you thank you! i cant wait for my weekend to start now that i have found your blog (found you through a google search on a two peas forum feed). i have been wanting to try digital scrapbooking, so much so, that my husband gifted me photoshop elements for christmas - opened the program and became overwhelmed very quickly... now with your ease of teaching i feel confident that i will be able to actually create something with your five steps. THANK YOU THANK YOU THANK YOU!!!
ReplyDeleteYou are welcome! Comments like this are what I live for! I'm glad I can help---please email me if you have any questions and I will be sure to answer!
Delete