
Today I wanted to share my experience with creating actions.
Please note that I have created a free action that you can download at the end of this post! YEAH!!
Now--first of all, remember that this blog is not for professionals, neither am I anywhere close to a professional in Photoshop. I'm an every day digital scrapbooker, and I'm here to tell you--YOU can make an action! It's not difficult! It's actually really cool!
What is an action? I have a whole blog post about it that I actually updated just recently; Lesson 10: Using Actions. In that post, I explain what an action is, how to install one, how to run one, and just a little about creating your own actions. Today I wanted to go into more detail.
Why would I use an action? An action is really just recording a set of instructions so you don't have to keep doing them over and over again. You can just press "play" and all those instructions just happen on their own. Here are some step by step instructions for an easy action. This is using CS5, but I'm sure it's similar if not exactly the same in other versions. However, I don't think actions are used the same in Photoshop Elements. If you have that version, you may want to search online for instructions on how to use actions for that program.
EXAMPLE - Practice with this simple scenario!
 Ok, let's say you have 30 picture files and you need to change them all from the size they are after being uploaded (in my case, 3872 pixels x 2592) to 1200 x 800. I also want them all black and white. All the files are the same size, and need to be changed to the same size. So, I want to create an action that will allow me to do this.
 1. In Photoshop, make sure your Actions menu is up. If its not already there, go to Window and select Actions.
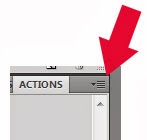
3. On the upper right corner click on the options button, shown in the image here.
4. If you have any current actions loaded, select Clear All Actions. Then choose "New Action."
5. It will prompt you to name it--just give it a name. In this case, "Resize B&W" might work.
 6. Now, the action will not actually record anything until you press the record button. You can even top recording, and then start again.
 EVERYTHING you do once you press record will be repeated in your action, so think carefully what you can do automatically. I do not want opening the file to be part of the action--I want to be able to select the file beforehand. So, choose a photo and pull it into Photoshop to get started. It should be your only layer.
7. Press Record. Then immediately do CTRL+Shift+U to desaturate your picture. You will see that command appear in your actions palette, as shown in the picture.
8. Now go to Image>Size and type 1200 in the width box. Press enter.
9. Stop the action by pressing stop.
Now, you may be done. But, if you want to resave the file and close it as part of the action, you could do that in the action as well. Press record again, and save the document to a new location but with the same name, OR, check the "save as copy" box in the saving menu. Then close the file. Now press stop again. Otherwise, just stop at the end of step 9.
10. Test it. Open a new photo. Go back to the first pull down arrow where your title is (in my example, I just called it Action 1). Press the play button. If it worked, you should see your photo immediately go black and white and resize. If you did the next step, then the photo closes as well and you are ready to bring in another one!
11. Save it. If you don't save this action, you will eventually lose it. If you like it and want to save it, click on "Set 1" part of the action--you can only save a set, not just an individual action. Then pull down your option menu in the Action palette again, and choose "Save Action..." (If its greyed out, that is because you have the action selected and not the set!) Name it and find a good location for it. I put it with all my other actions, in a new folder entitled "My Actions."
Batching Actions
Can I do a mass action? YES YOU CAN!
Like I said at the beginning of the scenario--there are 30 photos. Do I have to pull in each photo one by one and do this action? No. You can run the action as a batch one time and do ALL the photos!
- Go to File>Automate>Batch.

- Choose the action you want to batch--mine came up automatically because its the only action open in my palette.
- Next, choose a source folder--it will do ALL the photos in that folder.
- Check the "Suppress file open options dialogs" box and the "Suppress color profile warnings" so that your action runs without unnecessary interruptions.
- Then just click OK. Watch as the magic happens!
Now that you have tried a basic action, let look at one that I created today!
I found this AWESOME tutorial by Steve Patterson:

I wanted to write the word "October." It took me several tries going through the tutorial to get it right, and I kept making a mistake halfway through. Finally, I made an action of the first half so I didn't have to keep doing that half over and over before I could do the second half. Once I had it down, I just turned the whole thing into an action! Now, I write the word, press play, and wala!! There it is!
- One tip I have for this--if you are pulling in a new layer or picture that has a name, change the name to "original" or something like that as part of the action in the very beginning. Then when you run the same action with a different image or word, it will not get confused by different layer names!
And here is the action I created! You are welcome to download it, but know that the actual hard work came from Steve Patterson who created the tutorial--all I did was turn it into an action!
Instructions: Start with a white page and type your text in black. Make sure that the text box is not too big--it should be tight around the wording. (That's what I kept messing up on!) Also make sure there is plenty of white space around your word. It works with pretty much any font.

So now my new goal is to find more of these awesome tutorials and turn them into actions! Then I might actually use them--because going through that tutorial every time is exhausting! I hope this lesson on Actions has been useful to you!
No comments:
Post a Comment