The Clone Tool
I love the clone tool. Over the years I've found countless ways of using it. One time I had another teacher ask me to "touch up" her school photo--she was a beautiful woman in her 40's, but the picture just hadn't turned out well. After tackling it with the clone tool, the teacher just laughed. "Give me some of my wrinkles back!" she said. "I look too young in this!"
The clone tool looks like this:

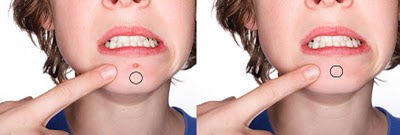
The clone tool allows you to copy a certain area into another area. It's great for removing blemishes or filling in an area to make it match what's around it. When you select the clone tool, hold down the alt key, and then click in the area that you want to keep. Then, just click it somewhere else. It will copy what you first clicked to where you clicked next. Just try it--you'll see what I mean.
 Here's an example. With my clone stamp chosen, I hold down the ALT key, and click on the CLEAR part of her chin--the part that I want to clone. Remember--if the brush you are using (the circle) is too large or too small, just right click. It will pull up a menu where you can change the size of the brush.) Then I just click a few times on the blemish and it will completely cover it up.
This is example is, of course, a little simplistic--sometimes using the clone tool can be a lot more difficult that that--it takes a lot of practice. It can be hard to find an area to clone that is the right shade of what you are trying to cover up. Really large blemishes can be difficult. I use this same technique on wrinkles, too. Sometimes it will require you to go back and re-select a clone area with the ALT key in order to get it right.
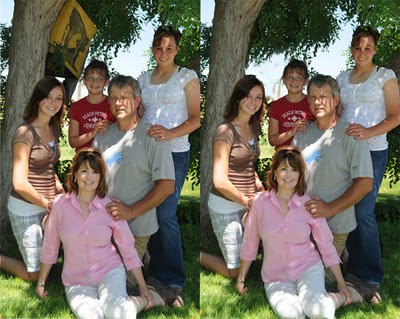
I've also used the clone tool to fix backgrounds. For instance, my sister took this lovely picture of my cousin and his family. But then--there's that ugly bag thingie in the background. What the crap is that? Totally destroys the picture. Using the clone tool, I selected other areas of the photo where there was blue sky or leaves, and covered up the bag. It's not perfect--but it works.

Another time, we had a family photo taken. We couldn't find a photo that had everyone in it looking good. The best one had all but one grandchild looking great. HE was holding is arms in front of his face! So, I got another shot where he looked just fine and placed it on top of the other photo. Then I used the clone tool to even out the edges and make it look like it fit right in. In the end, you can't even tell it was Photoshopped!
The Healing Tool
I'm sad to say that often I use the Clone tool, when in reality the Healing tool would be a better choice. They are very similar--they both require you to select an area by holding down the ALT key, and then it will copy that area for you as you click and drag. What's the difference?
Well, the Clone tool is more like copy and paste. The healing tool BLENDS. It will take what you copied with the ALT key, and blend it with the area around it. The heal tool looks like a bandaid:

Here's an example of when to use the healing tool:
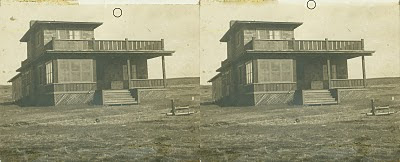
 Just like the Clone tool, you hold down the ALT key and select the area you want to blend with. This photo has an ugly line at the top--probably left over from a piece of tape. To cover that, I just click and drag across it. The area will blend it's lighter color with the darker color I started with. You can't completely get rid of that dark area on the upper left because the heal tool will only blend--it won't get rid of it. To get rid of it, use the clone tool.
Red Eye
This tool is not available in all version of Photoshop. I'm not sure which version first had this tool--if you know, feel free to add it to comments! But, if you have an older version like Photoshop 7, I'll show you another way to remove red-eye, though it's not as good. The red eye tool is located in the pull-down menu of the healing tool.
 And using it is ridiculously simple. Just click on the red eye tool, and then click on the red eye in the photo. It will automatically fill the red eye with a nice natural black. That cool.
Red-Eye in Older Versions
Now, for those of you who have an older version, there is another way to get rid of red-eye. It's not quite as good, but it works. On your tool bar, click on the brush tool.
 Now, once you have selected the brush tool, you'll see the top tool bar has changed. Where it says "mode" and "normal" pull down the menu and choose COLOR, which is near the bottom.
Now, make sure you have chosen black in your color picker. Then, just paint the red areas with the brush. Remember, to change the size or brush shape, just right click and it will give you a menu. The effect is more gray than dark, and doesn't look as good as the red-eye tool. But it's good enough!

Oooh, this is going to be one of my new favorite sites!! I just (finally) added you to my blogroll- thank you for your interest!
ReplyDeleteLoving the digital info here- awesome:)
Memories by Christine scrapbooking
http://mbcscrapbooking.blogspot.com
Link up your projects every Thursday!
Make your baby album with MBC! Workshop begins September 13