
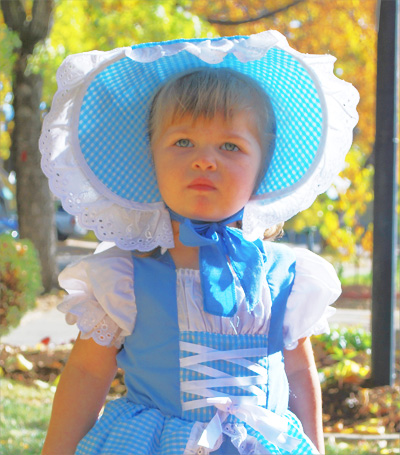
 Ok, here's a picture of my little girl on Halloween. (Isn't she freaking adorable? She was Little Bo Peep and my twins were the sheep!) This photo is exactly as it was taken. The only thing I've done to it is crop it. As you can see, the sunlight and her huge hat are at odds with each other--a lot of shadow on her face, but sun in the background. Usually, with most photos, I do CTRL+M, or Levels, to change the brightness on it and lighten it up a bit. And that's ok. But with a photo like this one, it tends to give too much drama between the light and the dark. Here is what the photo would look like using the Levels feature.
 Now, this is fine, it really is. But it's a little bright. And if I go less bright, her face is too much in shadow. So now we will use the little technique I just learned.
Step 1: Change the Contrast

I usually use CTRL+M, or Levels, to change the contrast of my pictures. The problem is that sometimes this can leave your pictures a little too bright and unnatural looking. So for this tutorial, go to Image>Adjustments>Brightness/Contrast, and lighten up the picture a bit if needed. here is what mine looks like after changing the contrast.
Step 2: Duplicate the layer
Now, with your picture layer highlighted, right click and choose Duplicate.
Step 3: Change the new layer to black and white
Making sure you have your duplicate layer highlighted, do CTRL+SHIFT+U. This will change it to black and white.

Step 4: Invert
Step 5: Change the blending mode

 Double click on your inverted layer. On the blend mode, which is now set to "normal," pull down the menu and choose "overlay." This will change the look of your picture. It basically makes all the dark spots light and all the light spots dark. It will be a little fuzzy when you first do it.
Step 6: Change Opacity

Now all you have to do it change the opacity on your second layer until it looks how you want it to. So, with that layer highlighted, in the layers panel, pull down the Opacity arrow and move the cursor up and down until you get the look you want.
I like this technique because it puts a bit more light on the face without making the sunny parts too overpowering. I certainly wouldn't use it with every picture, but for some pictures it's just perfect!

No comments:
Post a Comment