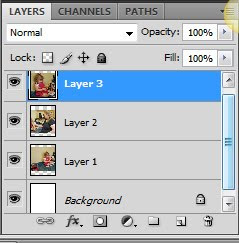
One of the fundamental things you need to understand about Photoshop is it's use of layers. Every element on a page is a different layer. Think of it like a paper scrapbook--you lay down your background paper--layer one. You lay down your first picture--layer 2. You attach a button to the picture--layer three. And so on.
Now, in Photoshop, in order to move a layer, you have to have it selected. The first tool you need to be famliar with is you move tool, which looks like this:

Its the first tool on your tool bar. It does what it sounds like it does. If you have this tool selected, you can click and drag on elements to move or resize them.
1. Open Photoshop
2. Using the information from Lesson 2, go to file, new, and create a blank page.
3. Pull in several photos. Remember, after you pull them into Photoshop, you still need to pull them into your blank page you've created. (If you have CS4, remember to float all windows, as shown in the video on lesson 2) Your photos will be big and overlap eachother--that's fine for now. What you want is to just have several layers showing in your layer menu.
4. Now, on your right, you will see the layers menu. It probably looks something like this.
 Whatever layer you select will be gray (or blue), and that is the layer you are ready to work with. If I want to move a certain picture, I need to be sure that I have that layer selected.
Now, as you get more and more into digital scrapbooking, you will get pages with TONS of layers. It can be hard to find it on that right panel. So, if you want to select a certain layer, just right click on it and select it from the list. Then you can move it where you want.
Try selecting different layers on your page in Photoshop and moving them around--make sure you understand this concept before moving on! Its essential!
Selecting, Connecting, and Forgetting
There are a lot of other things you can do to manipulate your layer.
- Click and drag on the layer within the menu and you can change the order. Whatever layer is the highest on the list is on TOP of the layers below it. This can become important when you, say, want pictures to overlap. You can choose which layers are on top or below.
- Drag the layer on top of the trashcan icon in the lower left corner. This will allow you delete your layer.
- Hold down the ALT key and then click on your layer (in your document, not the layer menu) and drag. This will duplicate your layer.
- Hold down the CTRL key and select another layer. Now you have more than one layer selected and they will move together. Try moving them on your document and see how they go together.
- Now, with them highlighted, click on the chain link picture in the bottom of the layer menu. This has linked your highlighted layers. Now they will stay together as one layer whether you have it highlighted or not. But, you can unlink it if you choose.
- With your linked layers highlighted, press CTRL+E. Now those linked layers are one forever. You can't unlink them unless you undo it. I use this a lot to link pictures with their frames or something.
Here's a little video to show you everything we've learned about layers in this lesson!
Manipulating_Layers -Realscrappy.blogspot.com (Click to view)
No comments:
Post a Comment